使用
OKHttp 是作为 Android 开发人员使用最多的网络库之一, 接下来从最基础的使用来介绍 OkHttp 源码里面是如何工作的。
首先需要添加OKHttp的依赖
1
|
implementation 'com.squareup.okhttp3:okhttp:3.5.0' |
使用
简单介绍基础使用,详细的使用参考官网文档: https://square.github.io/okhttp/
 1
 2
 3
 4
 5
 6
 7
 8
 9
10
11
12
13
14
15
16
17
18
19
20
|
val client = OkHttpClient.Builder()
        .build()

val request = Request.Builder()
        .url("https://www.baidu.com/")
        .build()

// 直接请求
 val response = client.newCall(request)
        .execute()

// 异步请求
client.newCall(request)
        .enqueue(object : Callback {
            override fun onFailure(call: Call?, e: IOException?) {
            }

            override fun onResponse(call: Call?, response: Response?) {
            }
        })
|
从上面的使用中可以看出首先是构建了 OKHttpClient 对象, 然后构建了一个 Request 对象,都是通过 Builder 设计模式来构建的,然后可以通过方法 execute 直接(同步)请求并拿到响应的结果, 也可以通过 enqueue 方法异步请求的方式, 在回调中拿到请求结果。本文主要从这两个方法入手, 参数的构建不做过多的描述。接下来看看 enqueue 是如何实现的:
1
2
3
4
5
6
7
8
|
  @Override public void enqueue(Callback responseCallback) {
    synchronized (this) {
      if (executed) throw new IllegalStateException("Already Executed");
      executed = true;
    }
    captureCallStackTrace();
    client.dispatcher().enqueue(new AsyncCall(responseCallback));
  }
|
这里首先是判断了 executed 是否已经执行了,如果这个请求已经执行了,则抛出异常。然后是使用了 client.dispatcher() 对象调用了 enqueue 方法。client.dispatcher() 其实是 Dispatcher 类, 在我们首次构建 OkHttpClient.Builder() 就已经构建出来这个 Dispatcher 对象了。这里可以先说明一下,这个 Dispatcher 其实是用来切线程的,内部维护了一些最大请求数量,和同主机下的请求数量。大致如下:
 1
 2
 3
 4
 5
 6
 7
 8
 9
10
11
12
13
14
15
16
17
18
19
20
21
22
23
24
25
26
27
28
29
30
31
32
33
34
35
36
37
38
39
40
41
42
43
44
45
46
|
public final class Dispatcher {
  // 最大请求数 - 可修改
  private int maxRequests = 64;
  // 同 host 主机下的请求数 - 可修改
  private int maxRequestsPerHost = 5;

  // 线程池
  /** Executes calls. Created lazily. */
  private ExecutorService executorService;

  // 准备请求的队列
  /** Ready async calls in the order they'll be run. */
  private final Deque<AsyncCall> readyAsyncCalls = new ArrayDeque<>();

  // 正在异步请求的队列
  /** Running asynchronous calls. Includes canceled calls that haven't finished yet. */
  private final Deque<AsyncCall> runningAsyncCalls = new ArrayDeque<>();

  // 正在同步请求的队列
  /** Running synchronous calls. Includes canceled calls that haven't finished yet. */
  private final Deque<RealCall> runningSyncCalls = new ArrayDeque<>();

  // 创建线程池
  public synchronized ExecutorService executorService() {
    if (executorService == null) {
      executorService = new ThreadPoolExecutor(0, Integer.MAX_VALUE, 60, TimeUnit.SECONDS,
          new SynchronousQueue<Runnable>(), Util.threadFactory("OkHttp Dispatcher", false));
    }
    return executorService;
  }

  	// 异步请求
  synchronized void enqueue(AsyncCall call) {
    if (runningAsyncCalls.size() < maxRequests && runningCallsForHost(call) < maxRequestsPerHost) {
      runningAsyncCalls.add(call);
      executorService().execute(call);
    } else {
      readyAsyncCalls.add(call);
    }
  }

  // 同步请求
  synchronized void executed(RealCall call) {
    runningSyncCalls.add(call);
  }
}
|
- Dispatcher 类中比较重要的信息就是这些了,首先是维护了 3 个队列,然后创建了一个包含阻塞队列的线程池 ThreadPoolExecutor,存在 0 个核心线程数量,说明没有被保留的线程,初始状态 0 个线程,也就是所有空闲的线程都会被终止,非核心线程数是最大数,即随时可以创建新的线程来满足需要。线程保活的时间是 60 S
- 同步请求的情况下会将 call 请求添加到了同步队列中
- 异步请求做的逻辑是当最大的请求数量小于 maxRequests(64) 和同个主机的正在请求的数量小于 maxRequestsPerHost(5) 则使用线程池继续请求,否则将会将这个请求添加到准备请求队列中
那么如果是超过了这个范围就会被添加到 readyAsyncCalls 准备请求队列中,那么它后续这个队列中的请求又是在什么时候继续请求的呢?带着这个问题,稍后再看下
刚才分析的是 client.dispatcher().enqueue(new AsyncCall(responseCallback)) 这个方法,目前已经知道是一个线程池,那么 enqueue 方法接受肯定也是一个 Runnable 对象,执行的是 run 方法中的代码,继续看看 AsyncCall 如何实现:
 1
 2
 3
 4
 5
 6
 7
 8
 9
10
11
12
13
14
15
16
17
18
19
20
21
22
23
24
25
26
27
|
final class AsyncCall extends NamedRunnable {
    private final Callback responseCallback;

    @Override protected void execute() {
      boolean signalledCallback = false;
      try {
        Response response = getResponseWithInterceptorChain();
        if (retryAndFollowUpInterceptor.isCanceled()) {
          signalledCallback = true;
          responseCallback.onFailure(RealCall.this, new IOException("Canceled"));
        } else {
          signalledCallback = true;
          responseCallback.onResponse(RealCall.this, response);
        }
      } catch (IOException e) {
        if (signalledCallback) {
          // Do not signal the callback twice!
          Platform.get().log(INFO, "Callback failure for " + toLoggableString(), e);
        } else {
          responseCallback.onFailure(RealCall.this, e);
        }
      } finally {
        // 结束的时候调用
        client.dispatcher().finished(this);
      }
    }
}
|
AsyncCall 类继承了 NamedRunnable 类,其中 NamedRunnable 类实现了 Runnable 接口,所以说 execute 就是在 run 方法中执行的。其中 OKHttp 重要的实现部分就是在这个地方了,getResponseWithInterceptorChain 通过拦截器链获取响应的结果,判断是成功还是失败的,通过接口回调到外部,最终 finally 中调用结束的方法。先看下 getResponseWithInterceptorChain 实现:
 1
 2
 3
 4
 5
 6
 7
 8
 9
10
11
12
13
14
15
16
17
18
19
20
21
22
23
24
25
|
  Response getResponseWithInterceptorChain() throws IOException {
    // Build a full stack of interceptors.
    List<Interceptor> interceptors = new ArrayList<>();
    // 添加自己实现的 拦截器
    interceptors.addAll(client.interceptors());
    // 添加重试拦截器
    interceptors.add(retryAndFollowUpInterceptor);
    // 添加桥接拦截器 // tcp
    interceptors.add(new BridgeInterceptor(client.cookieJar()));
    // 添加缓存拦截器
    interceptors.add(new CacheInterceptor(client.internalCache()));
    // 添加连接拦截器
    interceptors.add(new ConnectInterceptor(client));
    if (!forWebSocket) {
      // 网络拦截器
      interceptors.addAll(client.networkInterceptors());
    }
    // 请求服务器拦截器
    interceptors.add(new CallServerInterceptor(forWebSocket));

  	// 将所有拦截器连在一起的形成一条链
    Interceptor.Chain chain = new RealInterceptorChain(
        interceptors, null, null, null, 0, originalRequest);
    return chain.proceed(originalRequest);
  }
|
最终调用 RealInterceptorChain 的 proceed 方法:
 1
 2
 3
 4
 5
 6
 7
 8
 9
10
11
12
13
14
15
16
17
18
19
20
|
  public Response proceed(Request request, StreamAllocation streamAllocation, HttpCodec httpCodec,
      Connection connection) throws IOException {
    if (index >= interceptors.size()) throw new AssertionError();

    calls++;

    // Call the next interceptor in the chain.
    RealInterceptorChain next = new RealInterceptorChain(
        interceptors, streamAllocation, httpCodec, connection, index + 1, request);
    Interceptor interceptor = interceptors.get(index);

    Response response = interceptor.intercept(next);

    // Confirm that the intercepted response isn't null.
    if (response == null) {
      throw new NullPointerException("interceptor " + interceptor + " returned null");
    }

    return response;
  }
|
假设这里的 interceptors 和 networkInterceptors 拦截器目前我们都没有添加。那么这里获取的第一个拦截器就是 retryAndFollowUpInterceptor 重试拦截器,接着会调用它的 intercept 方法
 1
 2
 3
 4
 5
 6
 7
 8
 9
10
11
12
13
14
15
16
17
18
19
20
21
22
23
24
25
26
27
28
29
30
31
32
33
34
35
36
37
38
39
40
41
42
43
44
45
46
47
48
49
50
51
52
53
54
55
56
57
58
59
60
61
62
63
64
65
66
67
68
69
70
71
72
73
74
75
76
77
78
79
80
81
82
83
|
  @Override public Response intercept(Chain chain) throws IOException {
    Request request = chain.request();

    streamAllocation = new StreamAllocation(
        client.connectionPool(), createAddress(request.url()), callStackTrace);

    int followUpCount = 0;
    Response priorResponse = null;
    while (true) {
      if (canceled) {
        streamAllocation.release();
        throw new IOException("Canceled");
      }

      Response response = null;
      boolean releaseConnection = true;
      try {
        response = ((RealInterceptorChain) chain).proceed(request, streamAllocation, null, null);
        releaseConnection = false;
      } catch (RouteException e) {
        // The attempt to connect via a route failed. The request will not have been sent.
        if (!recover(e.getLastConnectException(), false, request)) {
          throw e.getLastConnectException();
        }
        releaseConnection = false;
        continue;
      } catch (IOException e) {
        // An attempt to communicate with a server failed. The request may have been sent.
        boolean requestSendStarted = !(e instanceof ConnectionShutdownException);
        if (!recover(e, requestSendStarted, request)) throw e;
        releaseConnection = false;
        continue;
      } finally {
        // We're throwing an unchecked exception. Release any resources.
        if (releaseConnection) {
          streamAllocation.streamFailed(null);
          streamAllocation.release();
        }
      }

      // Attach the prior response if it exists. Such responses never have a body.
      if (priorResponse != null) {
        response = response.newBuilder()
            .priorResponse(priorResponse.newBuilder()
                    .body(null)
                    .build())
            .build();
      }

      Request followUp = followUpRequest(response);

      if (followUp == null) {
        if (!forWebSocket) {
          streamAllocation.release();
        }
        return response;
      }

      closeQuietly(response.body());

      if (++followUpCount > MAX_FOLLOW_UPS) {
        streamAllocation.release();
        throw new ProtocolException("Too many follow-up requests: " + followUpCount);
      }

      if (followUp.body() instanceof UnrepeatableRequestBody) {
        streamAllocation.release();
        throw new HttpRetryException("Cannot retry streamed HTTP body", response.code());
      }

      if (!sameConnection(response, followUp.url())) {
        streamAllocation.release();
        streamAllocation = new StreamAllocation(
            client.connectionPool(), createAddress(followUp.url()), callStackTrace);
      } else if (streamAllocation.codec() != null) {
        throw new IllegalStateException("Closing the body of " + response
            + " didn't close its backing stream. Bad interceptor?");
      }

      request = followUp;
      priorResponse = response;
    }
  }
|
首先是创建了 StreamAllocation 对象,创建了一个连接池 connectionPool 和 Address 对象,主要做了一些参数的赋值,前期的预备工作,设置 host ,设置端口,设置 dns ,证书,代理等等。
 1
 2
 3
 4
 5
 6
 7
 8
 9
10
11
12
13
14
|
private Address createAddress(HttpUrl url) {
    SSLSocketFactory sslSocketFactory = null;
    HostnameVerifier hostnameVerifier = null;
    CertificatePinner certificatePinner = null;
    if (url.isHttps()) {
      sslSocketFactory = client.sslSocketFactory();
      hostnameVerifier = client.hostnameVerifier();
      certificatePinner = client.certificatePinner();
    }

    return new Address(url.host(), url.port(), client.dns(), client.socketFactory(),
        sslSocketFactory, hostnameVerifier, certificatePinner, client.proxyAuthenticator(),
        client.proxy(), client.protocols(), client.connectionSpecs(), client.proxySelector());
}
|
然后会调用了 RealInterceptorChain 的 proceed 方法,在这个方法中有一个变量,那就是 call++ ,那么到这里就会交给下一个拦截器进行处理了。其实后续的拦截器的大体逻辑都是这样的, proceed 表示就是去交给下一个拦截器处理,不过可以注意下,proceed 有一个前后的关系,也就是假如说现在交给下一个拦截器处理了,下一个拦截器处理完成了,还会返回回来继续处理当上一个拦截器的 proceed 后面部分代码的逻辑。有点像递归一样,具体可以看后面部分。
retryAndFollowUpInterceptor 中请求完成后,根据服务器返回的 code 请求,决定是否需要重试,主要的代码逻辑是 followUpRequest 这个里面,如果符合条件的话,然后再通过死循环的方式,继续重试当前的请求。看看 followUpRequest 是如何实现的
 1
 2
 3
 4
 5
 6
 7
 8
 9
10
11
12
13
14
15
16
17
18
19
20
21
22
23
24
25
26
27
28
29
30
31
32
33
34
35
36
37
38
39
40
41
42
43
44
45
46
47
48
49
50
51
52
53
54
55
56
57
58
59
60
61
62
63
64
65
66
67
68
69
70
71
72
73
74
75
76
77
78
79
80
81
82
83
84
85
86
87
88
89
90
|
  private Request followUpRequest(Response userResponse) throws IOException {
    if (userResponse == null) throw new IllegalStateException();
    Connection connection = streamAllocation.connection();
    Route route = connection != null
        ? connection.route()
        : null;
    int responseCode = userResponse.code();

    final String method = userResponse.request().method();
    switch (responseCode) {
      case HTTP_PROXY_AUTH:// 407:请求要求代理的身份认证,与401类似,但请求者应当使用代理进行授权
        Proxy selectedProxy = route != null
            ? route.proxy()
            : client.proxy();
        if (selectedProxy.type() != Proxy.Type.HTTP) {
          throw new ProtocolException("Received HTTP_PROXY_AUTH (407) code while not using proxy");
        }
        return client.proxyAuthenticator().authenticate(route, userResponse);

      case HTTP_UNAUTHORIZED:// 401:请求要求用户的身份认证
        return client.authenticator().authenticate(route, userResponse);

      // 3xx 重定向,需要进一步的操作以完成请求
      case HTTP_PERM_REDIRECT:
      case HTTP_TEMP_REDIRECT:
        // "If the 307 or 308 status code is received in response to a request other than GET
        // or HEAD, the user agent MUST NOT automatically redirect the request"
        if (!method.equals("GET") && !method.equals("HEAD")) {
          return null;
        }
        // fall-through
      case HTTP_MULT_CHOICE:
      case HTTP_MOVED_PERM:
      case HTTP_MOVED_TEMP:
      case HTTP_SEE_OTHER:
        // Does the client allow redirects?
        if (!client.followRedirects()) return null;

        String location = userResponse.header("Location");
        if (location == null) return null;
        HttpUrl url = userResponse.request().url().resolve(location);

        // Don't follow redirects to unsupported protocols.
        if (url == null) return null;

        // If configured, don't follow redirects between SSL and non-SSL.
        boolean sameScheme = url.scheme().equals(userResponse.request().url().scheme());
        if (!sameScheme && !client.followSslRedirects()) return null;

        // Most redirects don't include a request body.
        Request.Builder requestBuilder = userResponse.request().newBuilder();
        if (HttpMethod.permitsRequestBody(method)) {
          final boolean maintainBody = HttpMethod.redirectsWithBody(method);
          if (HttpMethod.redirectsToGet(method)) {
            requestBuilder.method("GET", null);
          } else {
            RequestBody requestBody = maintainBody ? userResponse.request().body() : null;
            requestBuilder.method(method, requestBody);
          }
          if (!maintainBody) {
            requestBuilder.removeHeader("Transfer-Encoding");
            requestBuilder.removeHeader("Content-Length");
            requestBuilder.removeHeader("Content-Type");
          }
        }

        // When redirecting across hosts, drop all authentication headers. This
        // is potentially annoying to the application layer since they have no
        // way to retain them.
        if (!sameConnection(userResponse, url)) {
          requestBuilder.removeHeader("Authorization");
        }

        return requestBuilder.url(url).build();

      case HTTP_CLIENT_TIMEOUT: // 服务器等待客户端发送的请求时间过长,超时
        // 408's are rare in practice, but some servers like HAProxy use this response code. The
        // spec says that we may repeat the request without modifications. Modern browsers also
        // repeat the request (even non-idempotent ones.)
        // 根据返回的 body 判断是否是UnrepeatableRequestBody不可以重复请求,否则继续请求
        if (userResponse.request().body() instanceof UnrepeatableRequestBody) {
          return null;
        }

        return userResponse.request();

      default:
        return null;
    }
  }
|
在上述代码中当 code 返回是 407 401 时候,会尝试将 authenticate 身份验证,再次尝试请求,或者是遇到上述代码中 3xx 的类型重定向的请求,也会重新请求。
下一个拦截器的逻辑就是 BridgeInterceptor :
 1
 2
 3
 4
 5
 6
 7
 8
 9
10
11
12
13
14
15
16
17
18
19
20
21
22
23
24
25
26
27
28
29
30
31
32
33
34
35
36
37
38
39
40
41
42
43
44
45
46
47
48
49
50
51
52
53
54
55
56
57
58
59
60
61
62
63
64
65
66
67
|
  @Override public Response intercept(Chain chain) throws IOException {
    Request userRequest = chain.request();
    Request.Builder requestBuilder = userRequest.newBuilder();

    RequestBody body = userRequest.body();
    if (body != null) {
      MediaType contentType = body.contentType();
      if (contentType != null) {
        requestBuilder.header("Content-Type", contentType.toString());
      }

      long contentLength = body.contentLength();
      if (contentLength != -1) {
        requestBuilder.header("Content-Length", Long.toString(contentLength));
        requestBuilder.removeHeader("Transfer-Encoding");
      } else {
        requestBuilder.header("Transfer-Encoding", "chunked");
        requestBuilder.removeHeader("Content-Length");
      }
    }

    if (userRequest.header("Host") == null) {
      requestBuilder.header("Host", hostHeader(userRequest.url(), false));
    }

    if (userRequest.header("Connection") == null) {
      requestBuilder.header("Connection", "Keep-Alive");
    }

    // If we add an "Accept-Encoding: gzip" header field we're responsible for also decompressing
    // the transfer stream.
    boolean transparentGzip = false;
    if (userRequest.header("Accept-Encoding") == null) {
      transparentGzip = true;
      requestBuilder.header("Accept-Encoding", "gzip");
    }

    List<Cookie> cookies = cookieJar.loadForRequest(userRequest.url());
    if (!cookies.isEmpty()) {
      requestBuilder.header("Cookie", cookieHeader(cookies));
    }

    if (userRequest.header("User-Agent") == null) {
      requestBuilder.header("User-Agent", Version.userAgent());
    }

    Response networkResponse = chain.proceed(requestBuilder.build());

    HttpHeaders.receiveHeaders(cookieJar, userRequest.url(), networkResponse.headers());

    Response.Builder responseBuilder = networkResponse.newBuilder()
        .request(userRequest);

    if (transparentGzip
        && "gzip".equalsIgnoreCase(networkResponse.header("Content-Encoding"))
        && HttpHeaders.hasBody(networkResponse)) {
      GzipSource responseBody = new GzipSource(networkResponse.body().source());
      Headers strippedHeaders = networkResponse.headers().newBuilder()
          .removeAll("Content-Encoding")
          .removeAll("Content-Length")
          .build();
      responseBuilder.headers(strippedHeaders);
      responseBuilder.body(new RealResponseBody(strippedHeaders, Okio.buffer(responseBody)));
    }

    return responseBuilder.build();
  }
|
BridgeInterceptor 中做的逻辑主要做的一些 Http 的一些 Header 设置、 contentLength 的计算、Content-Type 的设置,和 gzip 的解包解压缩,proceed 后做的操作主要是解包的操作。
接着下一个拦截器的逻辑就是 CacheInterceptor :
 1
 2
 3
 4
 5
 6
 7
 8
 9
10
11
12
13
14
15
16
17
18
19
20
21
22
23
24
25
26
27
28
29
30
31
32
33
34
35
36
37
38
39
40
41
42
43
44
45
46
47
48
49
50
51
52
53
54
55
56
57
58
59
60
61
62
63
64
65
66
67
68
69
70
71
72
73
74
75
76
77
78
79
80
81
82
83
84
85
86
|
  @Override public Response intercept(Chain chain) throws IOException {
    Response cacheCandidate = cache != null
        ? cache.get(chain.request())
        : null;

    long now = System.currentTimeMillis();

    // 工厂设计模式定义缓存策略
    CacheStrategy strategy = new CacheStrategy.Factory(now, chain.request(), cacheCandidate).get();
    Request networkRequest = strategy.networkRequest;
    Response cacheResponse = strategy.cacheResponse;

    if (cache != null) {
      cache.trackResponse(strategy);
    }

    if (cacheCandidate != null && cacheResponse == null) {
      closeQuietly(cacheCandidate.body()); // The cache candidate wasn't applicable. Close it.
    }

    // 返回失败的 Response
    if (networkRequest == null && cacheResponse == null) {
      return new Response.Builder()
          .request(chain.request())
          .protocol(Protocol.HTTP_1_1)
          .code(504)
          .message("Unsatisfiable Request (only-if-cached)")
          .body(Util.EMPTY_RESPONSE)
          .sentRequestAtMillis(-1L)
          .receivedResponseAtMillis(System.currentTimeMillis())
          .build();
    }

    // 如果 networkRequest 为 null ,将缓存返回
    if (networkRequest == null) {
      return cacheResponse.newBuilder()
          .cacheResponse(stripBody(cacheResponse))
          .build();
    }

    Response networkResponse = null;
    try {
      // 交给下一个拦截器处理
      networkResponse = chain.proceed(networkRequest);
    } finally {
      // If we're crashing on I/O or otherwise, don't leak the cache body.
      if (networkResponse == null && cacheCandidate != null) {
        closeQuietly(cacheCandidate.body());
      }
    }

    // If we have a cache response too, then we're doing a conditional get.
    if (cacheResponse != null) {
      // 数据未发生改变的情况下,将缓存返回
      if (networkResponse.code() == HTTP_NOT_MODIFIED) {
        Response response = cacheResponse.newBuilder()
            .headers(combine(cacheResponse.headers(), networkResponse.headers()))
            .sentRequestAtMillis(networkResponse.sentRequestAtMillis())
            .receivedResponseAtMillis(networkResponse.receivedResponseAtMillis())
            .cacheResponse(stripBody(cacheResponse))
            .networkResponse(stripBody(networkResponse))
            .build();
        networkResponse.body().close();

        // 更新缓存
        cache.trackConditionalCacheHit();
        cache.update(cacheResponse, response);
        return response;
      } else {
        closeQuietly(cacheResponse.body());
      }
    }

    Response response = networkResponse.newBuilder()
        .cacheResponse(stripBody(cacheResponse))
        .networkResponse(stripBody(networkResponse))
        .build();

    // 缓存起来 response
    if (HttpHeaders.hasBody(response)) {
      CacheRequest cacheRequest = maybeCache(response, networkResponse.request(), cache);
      response = cacheWritingResponse(cacheRequest, response);
    }

    return response;
  }
|
这里主要做的逻辑是缓存 response ,首先是请求前,使用工厂设计模式定义缓存策略,然后其中有两个比较重要的变量,起着比较重要的作用
- networkRequest:无网络即为 null,有网络则为将要发送的请求在的网络部分
- cacheResponse:无缓存即为 null,有缓存则为缓存的响应,用来返回或验证
然后就是 proceed 后请求到结果之后根据 cacheResponse 不为空和 code = HTTP_NOT_MODIFIED 是否需要使用缓存,更新缓存,并将响应返回。反之将此次结果给缓存起来。
接下来的拦截器就是 ConnectInterceptor :
 1
 2
 3
 4
 5
 6
 7
 8
 9
10
11
12
|
  @Override public Response intercept(Chain chain) throws IOException {
    RealInterceptorChain realChain = (RealInterceptorChain) chain;
    Request request = realChain.request();
    StreamAllocation streamAllocation = realChain.streamAllocation();

    // We need the network to satisfy this request. Possibly for validating a conditional GET.
    boolean doExtensiveHealthChecks = !request.method().equals("GET");
    HttpCodec httpCodec = streamAllocation.newStream(client, doExtensiveHealthChecks);
    RealConnection connection = streamAllocation.connection();

    return realChain.proceed(request, streamAllocation, httpCodec, connection);
  }
|
首先是这里 proceed 没有后续操作,主要的操作都在 newStream 中, 看看这个方法都干了什么:
 1
 2
 3
 4
 5
 6
 7
 8
 9
10
11
12
13
14
15
16
17
18
19
20
21
22
23
24
25
26
27
28
29
|
  public HttpCodec newStream(OkHttpClient client, boolean doExtensiveHealthChecks) {
    int connectTimeout = client.connectTimeoutMillis();
    int readTimeout = client.readTimeoutMillis();
    int writeTimeout = client.writeTimeoutMillis();
    boolean connectionRetryEnabled = client.retryOnConnectionFailure();

    try {
      RealConnection resultConnection = findHealthyConnection(connectTimeout, readTimeout,
          writeTimeout, connectionRetryEnabled, doExtensiveHealthChecks);

      HttpCodec resultCodec;
      if (resultConnection.http2Connection != null) {
        resultCodec = new Http2Codec(client, this, resultConnection.http2Connection);
      } else {
        resultConnection.socket().setSoTimeout(readTimeout);
        resultConnection.source.timeout().timeout(readTimeout, MILLISECONDS);
        resultConnection.sink.timeout().timeout(writeTimeout, MILLISECONDS);
        resultCodec = new Http1Codec(
            client, this, resultConnection.source, resultConnection.sink);
      }

      synchronized (connectionPool) {
        codec = resultCodec;
        return resultCodec;
      }
    } catch (IOException e) {
      throw new RouteException(e);
    }
  }
|
这个拦截器主要做的事情是负责建⽴连接。在这⾥,OkHttp 会创建出⽹络请求所需要的,TCP 连接,或者是 Https 连接,并且会创建出用于 HTTP 编码解码HttpCodec 对象
接下来的拦截器就是 CallServerInterceptor :
 1
 2
 3
 4
 5
 6
 7
 8
 9
10
11
12
13
14
15
16
17
18
19
20
21
22
23
24
25
26
27
28
29
30
31
32
33
34
35
36
37
38
39
40
41
42
43
44
45
46
47
48
|
  @Override public Response intercept(Chain chain) throws IOException {
    HttpCodec httpCodec = ((RealInterceptorChain) chain).httpStream();
    StreamAllocation streamAllocation = ((RealInterceptorChain) chain).streamAllocation();
    Request request = chain.request();

    long sentRequestMillis = System.currentTimeMillis();
    httpCodec.writeRequestHeaders(request);

    if (HttpMethod.permitsRequestBody(request.method()) && request.body() != null) {
      Sink requestBodyOut = httpCodec.createRequestBody(request, request.body().contentLength());
      BufferedSink bufferedRequestBody = Okio.buffer(requestBodyOut);
      request.body().writeTo(bufferedRequestBody);
      bufferedRequestBody.close();
    }

    httpCodec.finishRequest();

    Response response = httpCodec.readResponseHeaders()
        .request(request)
        .handshake(streamAllocation.connection().handshake())
        .sentRequestAtMillis(sentRequestMillis)
        .receivedResponseAtMillis(System.currentTimeMillis())
        .build();

    int code = response.code();
    if (forWebSocket && code == 101) {
      // Connection is upgrading, but we need to ensure interceptors see a non-null response body.
      response = response.newBuilder()
          .body(Util.EMPTY_RESPONSE)
          .build();
    } else {
      response = response.newBuilder()
          .body(httpCodec.openResponseBody(response))
          .build();
    }

    if ("close".equalsIgnoreCase(response.request().header("Connection"))
        || "close".equalsIgnoreCase(response.header("Connection"))) {
      streamAllocation.noNewStreams();
    }

    if ((code == 204 || code == 205) && response.body().contentLength() > 0) {
      throw new ProtocolException(
          "HTTP " + code + " had non-zero Content-Length: " + response.body().contentLength());
    }

    return response;
  }
|
这个拦截器就是实际发生的网络请求了,完成实际的网络流操作,利用 OKIO 将网络请求写入。和读取网络结果的响应,将结果的 response 返回,注意这里没有再调用 proceed 方法了,意味着不会再交给下一个拦截器处理了。然后就是返回给上一个拦截器也就是之前分析的 proceed 后面部分的代码逻辑了,整体的调用大致是这个样子的:
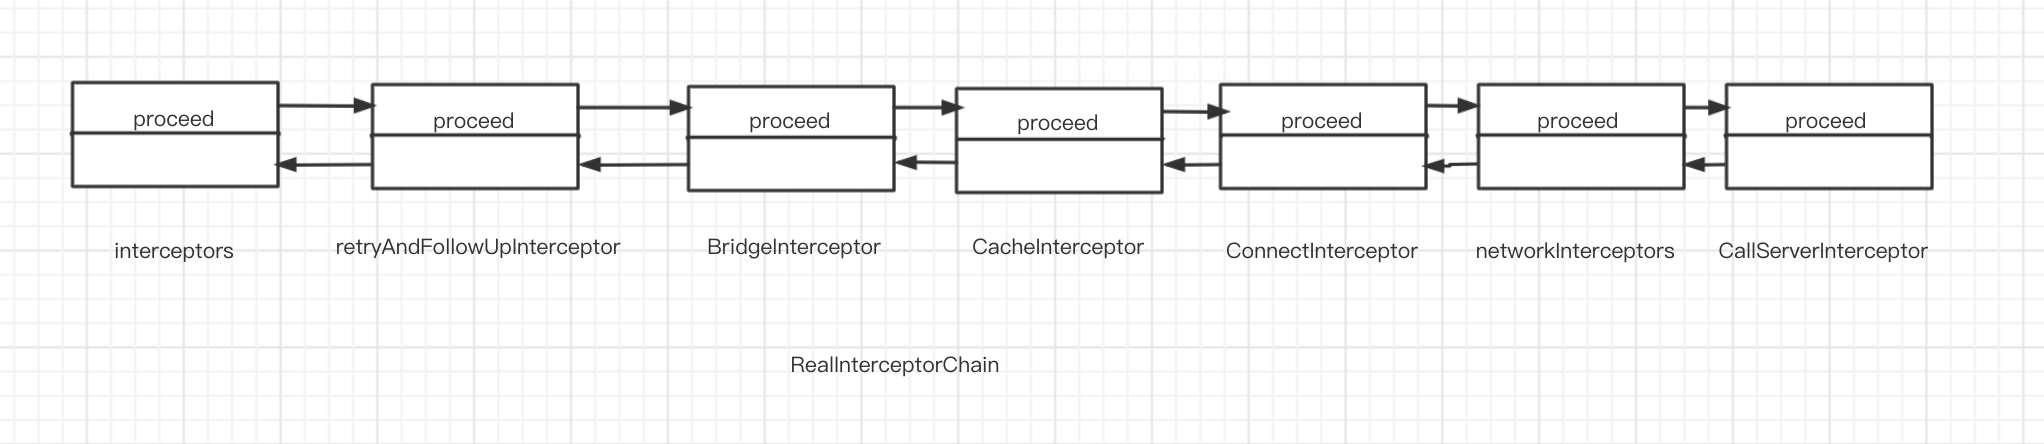
首先是从 interceptors 最先开始出发,先走自身拦截器的 process 的前半部分,然后调用 proceed 交给下一个拦截器,当最后一个拦截器都调用完毕后,再一级一级的返回请求的响应结果。最终回到 interceptors
网络优化
前面提到的拦截器大部分都是 OKHttp 内部已有的实现,其中有两个 interceptors 和 networkInterceptors 是我们可以在外部实现的,如果按照上图的调用顺序的话,networkInterceptors 的前面是 ConnectInterceptor 拦截器,后面是 CallServerInterceptor 拦截器,所以如果我们添加 networkInterceptors 拦截器,可以看到最原始的请求数据,当然 content-type,content-length 都是已经添加好的,并且拿到的响应数据也是最原始的。那么 interceptors 由于位置不相同,会有点不一样, interceptors 拦截器就是最初有这个请求的意图的起始点,proceed 后面部分就可以获取到响应结果了,就是已经解压好的 gzip 包,或者说是已经解码好的数据响应结果。那么如果这个时候,如果我们想知道当前的接口是那个 url, 请求了多少时间,请求的结果是什么,那么根据上面的分析,我们就可以添加的是 interceptors 拦截器,那么就是这样的:
 1
 2
 3
 4
 5
 6
 7
 8
 9
10
11
12
13
14
15
16
17
18
19
20
21
22
23
24
25
26
27
28
29
30
31
|
    private val client: OkHttpClient
        get() {
            val builder = OkHttpClient.Builder()
            val logging = HttpLoggingInterceptor()
            if (BuildConfig.DEBUG) {
                logging.level = HttpLoggingInterceptor.Level.BODY
            } else {
                logging.level = HttpLoggingInterceptor.Level.BASIC
            }
            builder.addInterceptor(logging)
                    .addInterceptor(mLoggingInterceptor)
                    .connectTimeout(TIME_OUT.toLong(), TimeUnit.SECONDS)
                    .readTimeout(TIME_OUT.toLong(), TimeUnit.SECONDS)
            handleBuilder(builder)
            return builder.build()
        }

    @SuppressLint("BinaryOperationInTimber")
    private val mLoggingInterceptor = Interceptor { chain ->
        val request = chain.request()
        val t1 = System.nanoTime()
        val response = chain.proceed(chain.request())
        val t2 = System.nanoTime()
        val contentType = response.body?.contentType()
        val content = response.body?.string()
        Logger.d("-okhttp-debug", "request \nurl:" + request.url + "\ntime:" + (t2 - t1) / 1e6 + "\nbody:" + content + "\n")

        response.newBuilder()
                .body(content?.toResponseBody(contentType))
                .build()
    }
|
基本所有的拦截器逻辑基本上就是这些了,到这里我们还遗留了一个问题,那就是准备请求的这个队列中的请求是在什么时候请求的,其实就是在当前的请求执行完成后,会调用 client.dispatcher().finished(this) 方法,那么最终会调用是这样的:
 1
 2
 3
 4
 5
 6
 7
 8
 9
10
11
12
13
14
|
  private <T> void finished(Deque<T> calls, T call, boolean promoteCalls) {
    int runningCallsCount;
    Runnable idleCallback;
    synchronized (this) {
      if (!calls.remove(call)) throw new AssertionError("Call wasn't in-flight!");
      if (promoteCalls) promoteCalls();
      runningCallsCount = runningCallsCount();
      idleCallback = this.idleCallback;
    }

    if (runningCallsCount == 0 && idleCallback != null) {
      idleCallback.run();
    }
  }
|
然后会调用 promoteCalls 方法:
 1
 2
 3
 4
 5
 6
 7
 8
 9
10
11
12
13
14
15
16
17
|
  private void promoteCalls() {
    if (runningAsyncCalls.size() >= maxRequests) return; // Already running max capacity.
    if (readyAsyncCalls.isEmpty()) return; // No ready calls to promote.

    for (Iterator<AsyncCall> i = readyAsyncCalls.iterator(); i.hasNext(); ) {
      AsyncCall call = i.next();

      if (runningCallsForHost(call) < maxRequestsPerHost) {
        i.remove();
        runningAsyncCalls.add(call);
        // 执行请求
        executorService().execute(call);
      }

      if (runningAsyncCalls.size() >= maxRequests) return; // Reached max capacity.
    }
  }
|
最终调用到 executorService().execute(call) 执行 readyAsyncCalls 队列中的请求,其实 execute 方法和 enqueue 中最终调用的逻辑基本是一样的
 1
 2
 3
 4
 5
 6
 7
 8
 9
10
11
12
13
14
15
16
17
18
19
20
21
22
23
|
    @Override protected void execute() {
      boolean signalledCallback = false;
      try {
        Response response = getResponseWithInterceptorChain();
        if (retryAndFollowUpInterceptor.isCanceled()) {
          signalledCallback = true;
          responseCallback.onFailure(RealCall.this, new IOException("Canceled"));
        } else {
          signalledCallback = true;
          responseCallback.onResponse(RealCall.this, response);
        }
      } catch (IOException e) {
        if (signalledCallback) {
          // Do not signal the callback twice!
          Platform.get().log(INFO, "Callback failure for " + toLoggableString(), e);
        } else {
          responseCallback.onFailure(RealCall.this, e);
        }
      } finally {
        client.dispatcher().finished(this);
      }
    }
  }
|
总结
- Dispatcher 线程调度器,用于后台执行网络请求,维护最大请求数量和同主机下的请求数量
- interceptors 外部添加的拦截器,主要可以获取到最终的网络响应结果
- retryAndFollowUpInterceptor 网络失败时重试,以及重定向,对用户是无感知的
- BridgeInterceptor 主要是添加 header 、content-type 类型确定、content-length 的计算
- CacheInterceptor 网络缓存的处理,根据有无网络,http 的响应码来具体返回缓存策略
- ConnectInterceptor 负责 TCP HTTPS 的连接建立
- networkInterceptors 外部添加的拦截器,可以看到原始的 HTTP 请求和响应
- CallServerInterceptor 负责实质的请求与响应的 I/O 操作,即往 Socket ⾥写⼊请求数据,和从 Socket ⾥读取响应数据
使用到的设计模式
- Builder 设计模式
- OkHttpClient 的构建
- Request 的构建
- 工厂设计模式
- CacheInterceptor 中的缓存策略工厂
- 享元设计模式
- 责任链设计模式