Gradle 是什么?
- 它是一款强大的构建工具,而不是语⾔
- 它使用了 Groovy 这个语言,创造了一种 DSL,但它本身不是语⾔
groovy 是什么
Groovy 是一种动态语言,它和 Java 类似(算是 Java 的升级版,但是又具备脚本语言的特点),都在 Java 虚拟机中运行。当运行 Groovy 脚本时它会先被编译成 Java 类字节码,然后通过 JVM 虚拟机执行这个 Java 字节码类
Gradle 的 Project 和 Tasks
每次构建(build)至少由一个 project 构成,一个 project 由一到多个 task 构成。每个 task 代表了构建过程当中的一个原子性操作,比如编译,打包,生成javadoc,发布等等这些操作
Gradle 的构建流程
通常来说,Gradle 一次完整的构建过程通常分成如下 三个部分:
- 初始化阶段:首先,在初始化阶段 Gradle 会决定哪些项目模块要参与构建,并且为每个项目模块创建一个与之对应的 Project 实例
- 配置阶段:然后,配置工程中每个项目的模块,并执行包含其中的配置脚本
- 执行阶段:最后,执行每个参与构建过程的 Gradle task
Gradle 的详细构建流程
1.初始化阶段
- 首先,在这个阶段中,会读取根工程中的 setting.gradle 中的 include 信息,确定有多少工程加入构建,然后,会为每一个项目(build.gradle 脚本文件)创建一个个与之对应的 Project 实例,最终形成一个项目的层次结构。 与初始化阶段相关的脚本文件是 settings.gradle,而一个 settings.gradle 脚本对应一个 Settings 对象,我们最常用来声明项目的层次结构的 include 就是 Settings 对象下的一个方法,在 Gradle 初始化的时候会构造一个 Settings 实例对象,以执行各个 Project 的初始化配置
2.配置阶段
- 配置阶段的任务是 执行各项目下的 build.gradle 脚本,完成 Project 的配置,与此同时,会构造 Task 任务依赖关系图以便在执行阶段按照依赖关系执行 Task。而在配置阶段执行的代码通常来说都会包括以下三个部分的内容,如下所示:
- build.gralde 中的各种语句
- 闭包
- Task 中的配置段语句
需要注意的是,执行任何 Gradle 命令,在初始化阶段和配置阶段的代码都会被执行
3.执行阶段
- Gradle 会根据各个任务 Task 的来执行对应的任务
BuildType 的使用
buildTypes {}封装此项目的所有构建类型配置
这里举一个例子,比如 flutter 的 debug 版本,在右上角会增加一个 debug 的图标,这个如果如果利用 BuildType 来实践的话,可以是这样的,假如如下有这么一个类,其中每个版本都有不一样的标识,那么在输出版本的时候一眼就能够看出这个是什么版本:
|
|
在 MainActivity 的使用
|
|
然后可以在相对应的 buildType 的路径下配置自己的逻辑,例如 release 、debug、internal 各种路径下配置的逻辑都各自不相同。其实这样的方式只写一个单独的类也是可以的,这里只是以这个场景举例,只不过这样的方式在打包的时候,只会引入一套源代码,节约一点空间,或者是配置的资源文件会更加的有优势
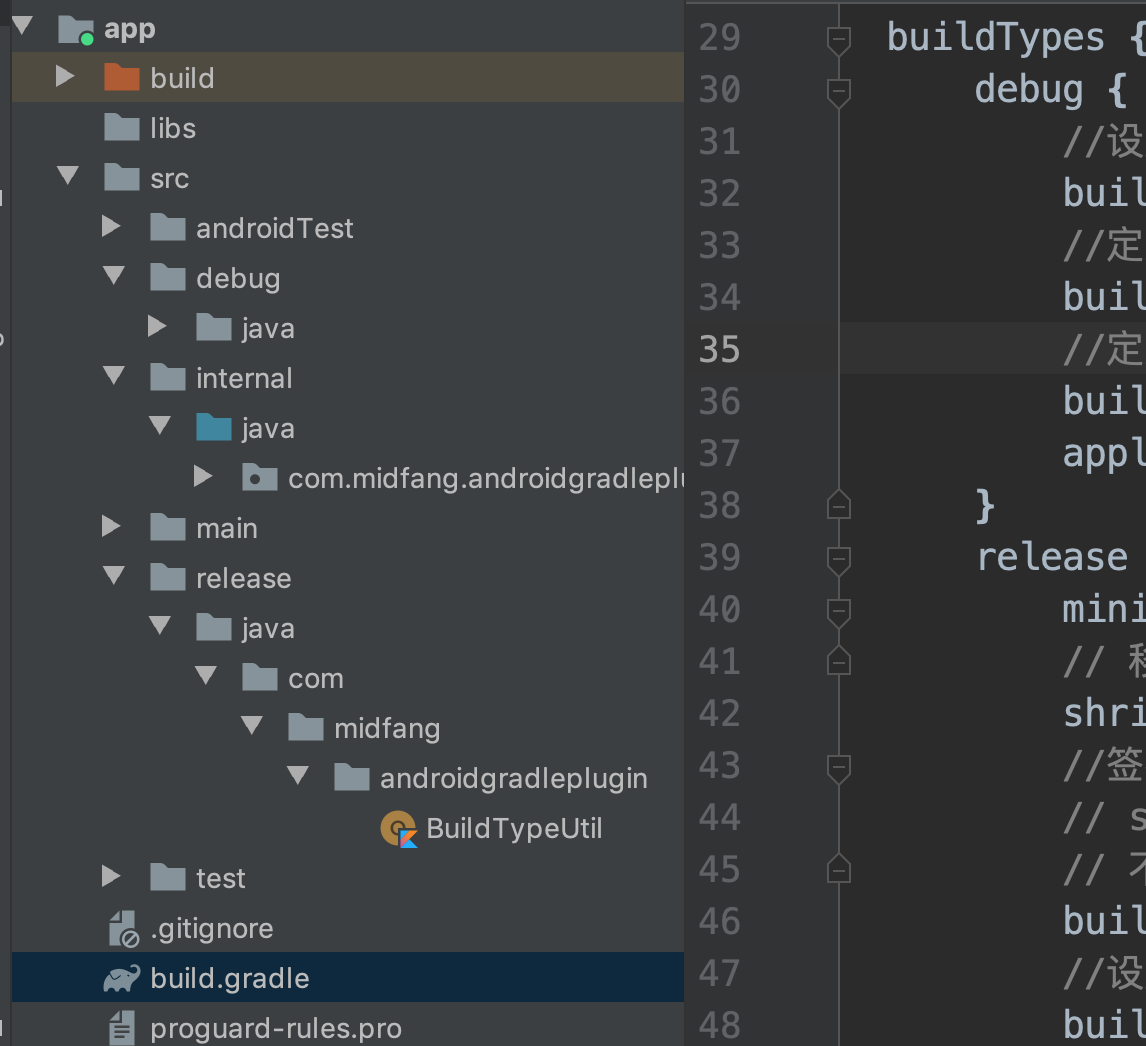
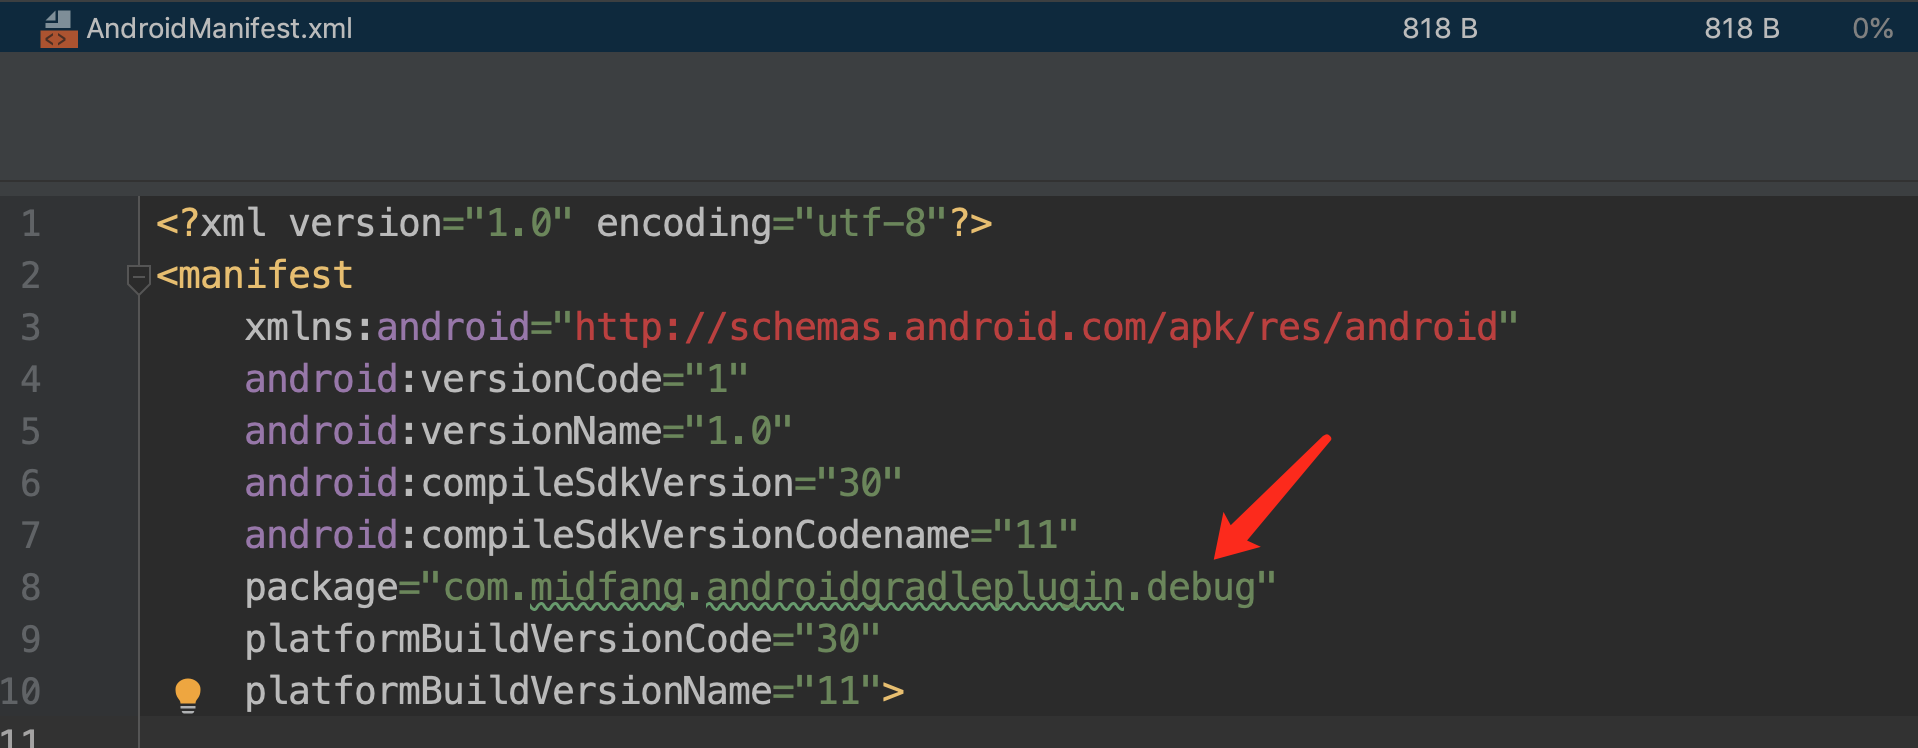
例如在 buildType 中配置 applicationIdSuffix “.debug” ,会在最终输出包中后面加上后缀,如下
buildConfigField 的配置,例如以下日志的开关,网络 IP,一些特殊的标识,都可以配置,配置的方式如下,需要注意的是,如果是 string 类型的字符串,需要再加上一个双引号,配置如下:
|
|
最终这些配置会生成在 BuildConfig 类当中,直接通过 BuildConfig.xxx 的使用即可
|
|
自定义 Task
格式
1 2 3task 任务的名字 { //do some things }例子
1 2 3 4 5 6 7 8 9 10 11 12 13 14//定义 task , 名字 hello task hello{ println "hello world" } //定义 task,名字 hello task(hello2){ println "hello world2" } //定义 task,名字 hello3 task ('hello3'){ println "hello world3" }在终端运行 gradle 命令
1 2 3 4 5 6 7 8//执行 hello task gradlew hello //执行 hello2 task gradlew hello2 //执行 hello3 task gradlew hello3
创建Action
在上面的举例中,是一个非正式的 task , 说非正式是因为创建的 task 里面没有 action 。task 本质上又是由一组被顺序执行的 Action 对象构成,Action 其实是一段代码块,类似于 Java 中的方法
创建 Action 相关 API
|
|
例子
1 2 3 4 5 6 7 8 9 10 11 12 13 14 15 16 17 18task hello { //创建一个 Action , 添加到 Action 列表的头部 doFirst(new Action<Task>() { @Override void execute(Task task) { println "action1++++++++++" } }) //创建一个 Action , 添加到 Action 列表的头部 doFirst { println "action2++++++++++" } doLast{ println "doLast++++++++++" } }
九:系统默认 task
|
|
例子
复制图片:单一数据源
1 2 3 4task copyImage(type: Copy) { from 'C:\\Users\\yiba_zyj\\Desktop\\gradle\\copy' into 'C:\\Users\\yiba_zyj\\Desktop' }复制图片:多个数据源
1 2 3 4 5 6task copyImage(type: Copy) { from 'C:\\Users\\yiba_zyj\\Desktop\\gradle\\copy' , 'C:\\Users\\yiba_zyj\\Desktop\\gradle\\copy' into 'C:\\Users\\yiba_zyj\\Desktop' }复制图片:过滤文件
1 2 3 4 5 6只会复制后缀为 .jpg 的文件 task copyImage(type: Copy) { from 'C:\\Users\\yiba_zyj\\Desktop\\gradle\\copy' into 'C:\\Users\\yiba_zyj\\Desktop' include "*.jpg" }复制文件:过滤文件,重命名
1 2 3 4 5 6 7task copyImage(type: Copy) { from 'C:\\Users\\yiba_zyj\\Desktop\\gradle\\copy' into 'C:\\Users\\yiba_zyj\\Desktop' include "*.jpg" exclude "image1.jpg" rename("image2.jpg","123.jpg") }删除文件
1 2 3 4task deleteFile(type: Delete) { //删除Android 更目录的aaa 文件 delete '../aaa' }
自定义 plugin
plugin 最基本的写法
1 2 3 4 5 6 7 8class pluginDemo implements Plugin<Project>{ @Override void apply(Project project) { println('base pluginDemo ') } } apply plugin: pluginDemo
执行一个打包命令,将会看到如下结果,插件执行成功:
|
|
接下来看下以一个 module 是如何自定义 plugin 的
- 以创建 java lib 的方式,创建一个工程,并把多余的 test 等等一些多余的文件删除掉,保留像如下格式:
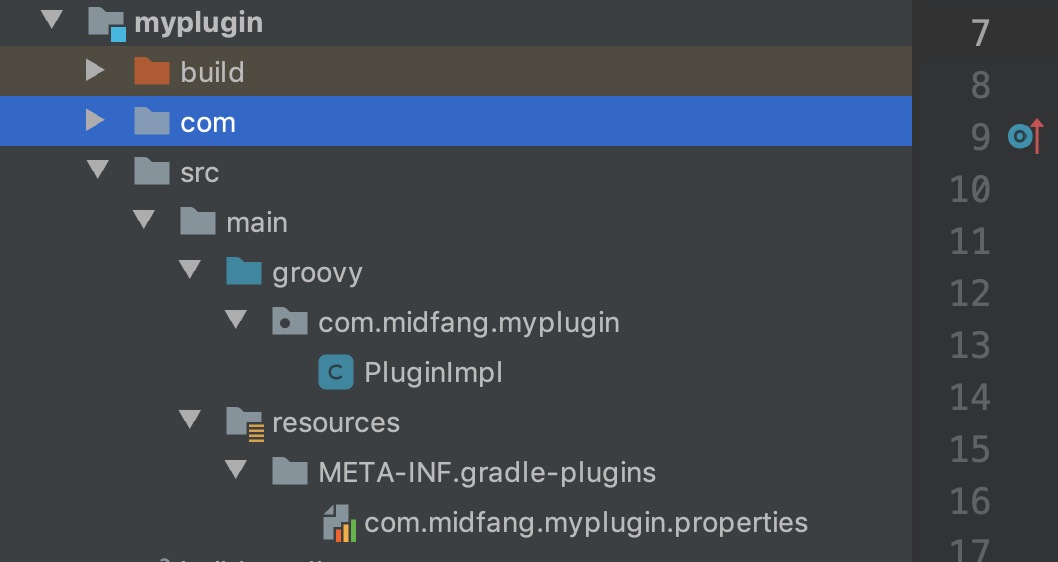 首先建立 groovy 目录,然后再创建一个 PluginImpl.groovy 的文件,注意这个文件不是 java 文件
|
|
然后再创建 resources 资源文件夹,resources目录下新建文件夹META-INF,META-INF文件夹下新建gradle-plugins文件夹,目录结果如上图所示,其中在 gradle-plugins文件夹下的 xxx.properties ,这个 xxx 的命名就是后面 apply plugin:xxx 导入插件的名字,这个 properties 的文件信息如下:
1
|
implementation-class=com.midfang.myplugin.PluginImpl |
修改 build.gradle 文件
|
|
这样配置好之后,这时候,右侧的 gradle Toolbar 就会在 module 下多出一个 task
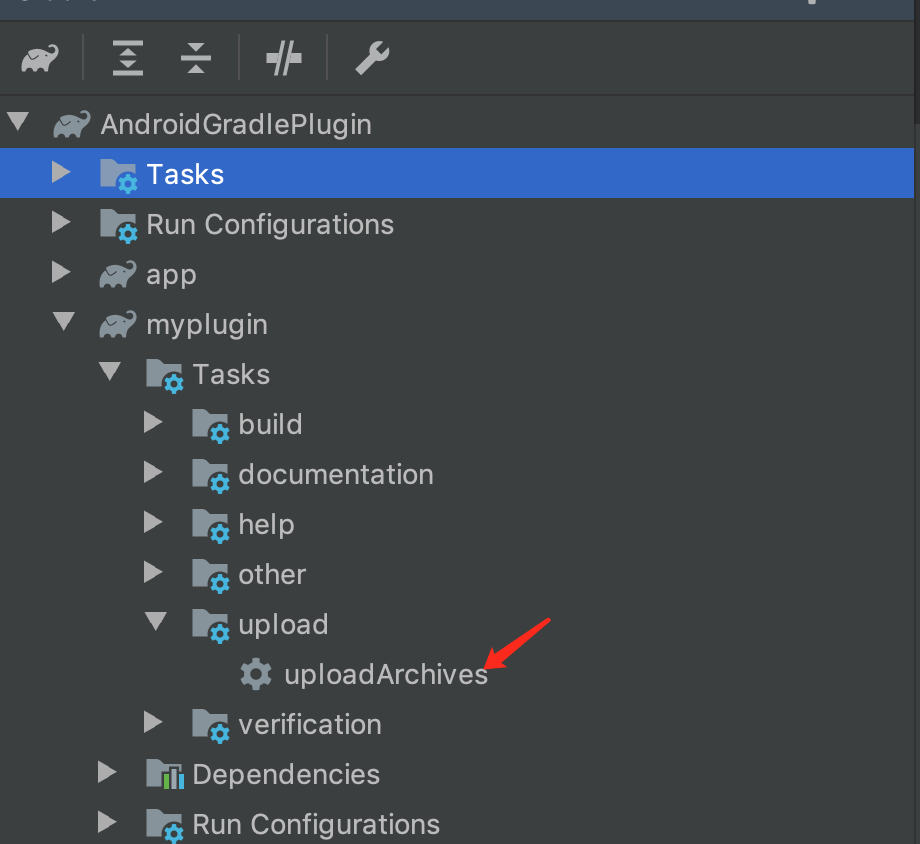
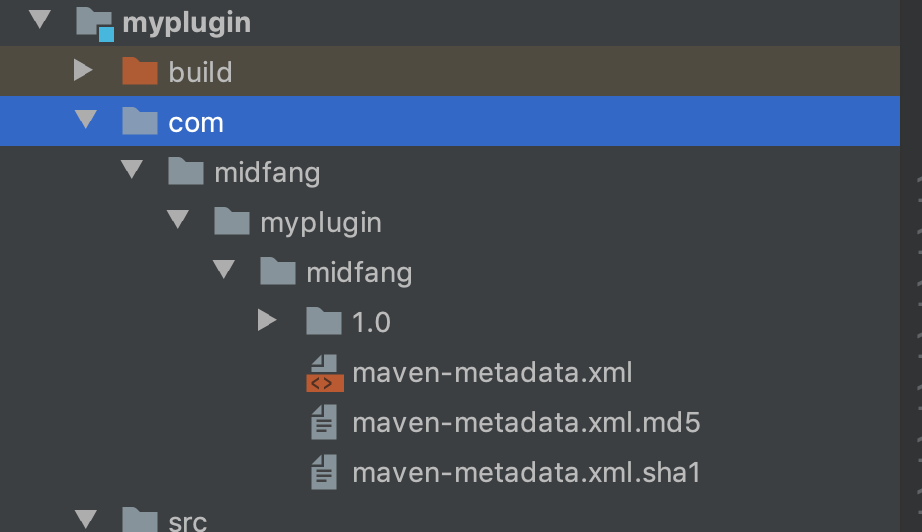
点击uploadArchives这个 Task,就会在项目下多出一个 myplugin 目录,里面存着这个 gradle 插件
插件的使用
我们来看下,发布到本地 maven 仓库的插件如何使用,在项目根目录下的gradle.build的文件中加入:
1 2 3 4 5 6 7 8 9 10 11 12 13 14 15 16 17 18 19 20 21 22 |
buildscript {
ext.kotlin_version = "1.3.72"
repositories {
google()
jcenter()
// 导入本地插件库
maven{
url uri('myplugin')
}
}
dependencies {
classpath "com.android.tools.build:gradle:4.1.1"
classpath "org.jetbrains.kotlin:kotlin-gradle-plugin:$kotlin_version"
// 自定义的插件
classpath 'com.midfang.myplugin:midfang:1.0'
// NOTE: Do not place your application dependencies here; they belong
// in the individual module build.gradle files
}
} |
app目录下的build.gradle文件中加入:
1 2 3 4 5 |
plugins {
id 'com.android.application'
id 'kotlin-android'
id 'com.midfang.myplugin'
} |
然后我们就可以使用该插件了,执行一次打包命令就可以发现插件已经生效了

项目优化
最原始项目中的 build.gradle 中可能是如下这样的
1 2 3 4 5 6 7 8 9 10 11 12 13 14 15 16 17 18 19 20 |
defaultConfig {
applicationId "com.midfang.androidgradleplugin"
minSdkVersion 21
targetSdkVersion 30
versionCode 1
versionName "1.0"
testInstrumentationRunner "androidx.test.runner.AndroidJUnitRunner"
}
dependencies {
implementation "org.jetbrains.kotlin:kotlin-stdlib:$kotlin_version"
implementation 'androidx.core:core-ktx:1.2.0'
implementation 'androidx.appcompat:appcompat:1.1.0'
implementation 'com.google.android.material:material:1.1.0'
implementation 'androidx.constraintlayout:constraintlayout:1.1.3'
testImplementation 'junit:junit:4.+'
androidTestImplementation 'androidx.test.ext:junit:1.1.1'
androidTestImplementation 'androidx.test.espresso:espresso-core:3.2.0'
} |
随着项目进行到后期,那么这里的 implementation xxx 将会越来越多,不太好管理,那么这里可以通过新建一个 config.gradle 文件,将所有的库版本信息都统一管理起来,最终修改后的配置如下:
1 2 3 4 5 6 7 8 9 10 11 12 |
def implementationDependencies = rootProject.ext.dependencies
def testImplementationDependencies = rootProject.ext.testImplementation
def androidTestImplementationDependencies = rootProject.ext.androidTestImplementation
dependencies {
implementation fileTree(include: ['*.jar'], dir: 'libs')
implementationDependencies.each { k, v -> implementation v }
testImplementationDependencies.each { k, v -> implementation v }
androidTestImplementationDependencies.each { k, v -> implementation v }
} |
config.gradle
1 2 3 4 5 6 7 8 9 10 11 12 13 14 15 16 17 18 19 20 21 22 23 24 25 26 27 28 29 30 31 32 33 34 35 36 37 38 39 40 41 42 43 44 45 46 |
ext {
android = [
applicationId : "com.midfang.androidgradleplugin",
compileSdkVersion: 30,
buildToolsVersion: "30.0.3",
minSdkVersion : 21,
targetSdkVersion : 30,
versionCode : 1,
versionName : "1.0.0"
]
/* 统一管理常用库版本信息 */
version = [
appcompatVersion : "1.1.0",
smartrefreshVersion : "1.1.0-alpha-21",
okhttpVersion : "3.9.0",
retrofitVersion : "2.3.0",
glideVersion : "4.0.0",
daggerVersion : "2.15",
butterknifeVersion : "8.8.1",
fragmentationVersion: "1.2.4",
leakcanaryVersion : "1.6.3"
]
dependencies = [
// base
"core-ktx" : "androidx.core:core-ktx:1.2.0",
"kotlin" : "org.jetbrains.kotlin:kotlin-stdlib:$kotlin_version",
"appcompat" : "androidx.appcompat:appcompat:${version["appcompatVersion"]}",
"material" : "com.google.android.material:material:${version["appcompatVersion"]}",
"constraint-layout": "androidx.constraintlayout:constraintlayout:1.1.3"
// more and more
]
testImplementation = [
"junit": "junit:junit:4.+"
]
androidTestImplementation = [
"androidx-test": "androidx.test.ext:junit:1.1.1",
"espresso-core": "androidx.test.espresso:espresso-core:3.2.0"
]
} |
如果是模块化的话也可以以文件或者是不同的数组进行统一的管理。或者还可以区分的更加细致一些,比如 api 的导入,注解,leakcanaryVersion 在 debug 的时候导入情况,含 exclude 的导入的统一管理,配置如下:
1 2 3 4 5 6 7 8 9 10 11 12 13 14 15 16 17 18 19 20 21 22 23 24 25 26 27 28 29 30 31 32 33 34 35 36 37 38 39 40 41 42 43 44 45 46 47 48 49 50 51 |
    // 处理所有的 implementation 依赖
    implementationDependencies.each { k, v -> implementation v }
    debugImplementationDependencies.each { k, v -> debugImplementation v }
    releaseImplementationDependencies.each { k, v -> releaseImplementation v }


    androidTestImplementationDependencies.each { k, v -> androidTestImplementation v }
    testImplementationDependencies.each { k, v -> testImplementation v }
    debugApiDependencies.each { k, v -> debugApi v }
    releaseApiDependencies.each { k, v -> releaseApi v }
    compileOnlyDependencies.each { k, v -> compileOnly v }

    // 处理 annotationProcessor 依赖
    processors.each { k, v -> annotationProcessor v }

    // 处理所有包含 exclude 的依赖
    implementationExcludes.each { entry ->
        implementation(entry.key) {
            entry.value.each { childEntry ->
                exclude(group: childEntry)
            }
        }
    }
    debugImplementationExcludes.each { entry ->
        debugImplementation(entry.key) {
            entry.value.each { childEntry ->
                exclude(group: childEntry.key, module: childEntry.value)
            }
        }
    }
    releaseImplementationExcludes.each { entry ->
        releaseImplementation(entry.key) {
            entry.value.each { childEntry ->
                exclude(group: childEntry.key, module: childEntry.value)
            }
        }
    }
    testImplementationExclude.each { entry ->
        testImplementation(entry.key) {
            entry.value.each { childEntry ->
                exclude(group: childEntry.key, module: childEntry.value)
            }
        }
    }
    androidTestImplementationExcludes.each { entry ->
        androidTestImplementation(entry.key) {
            entry.value.each { childEntry ->
                exclude(group: childEntry.key, module: childEntry.value)
            }
        }
} |
更多信息请参考源码地址:https://github.com/midFang/AndroidGradlePlugin